NOTE: To enable improved collaboration, you can send a direct link to the PI and Reviewers
From any standard eGC1 page (excluding Grant Runner forms), the URL is now a direct link that you can copy and share with others who have access to that eGC1. This will be particularly useful when collaborating with the PI on completing the Non-Fiscal Compliance page.
Copy this URL and share it with others who have direct access to this eGC1.
Non-Fiscal Compliance Overview
Use this page to provide details related to non-fiscal compliance information. These details will:
Identify special considerations in this application and bring them to the attention of reviewers.
Provide information necessary for the 91̽��approval process.
Provide information that may help campus unit and central office approvers review your application quickly.
Facilitate proposal review and central office review at time of award.
There are five sections on this summary page and each is covered in more detail in its own article.
Human Subjects (questions HS-1 and HS-2, and conditionally HS-1A and HS-1B)
NOTE: If you are viewing an older application, you will see the questions you answered at that time, displayed in read-only mode and organized into the sections listed above.
On this summary page, select “Start Section” to open a section for data entry.
Once you have started a section, when you return to the summary page, you will see a link to Edit Section. In addition, an Expand + link will display on the right of the section. Select it to open the section and view the data in read-only mode. The link will change to Collapse – when the section is expanded.
This page also has Expand All and Collapse All links above the first section, on the right side of the page. Use the Expand All link to open all of the sections in read-only mode. Collapse All will close all of the sections.
In the following image, the second section, Animal Use, shows the Edit Section link. The third section, Environmental Health & Safety, shows a section in the expanded, read-only view.
The “approval flow” includes all 91̽��individuals, divisions, departments, deans, and/or compliance offices (including OSP), that must review and sign off on a proposal before its submission to the sponsor. Review: How the Flow is Generated.
SAGE automatically routes the proposal to the individuals and units included in the approval flow. The system also sends email notifications of pending approvals to Approvers on campus. OSP uses their SAGE Central tasklist to manage proposals waiting for approval. Review: Reviewer Email Notifications.
As a reviewer, you can access the approval flow for an application from the Approvals tab in . You have the option of viewing a graphical or a textual representation of the approval flow. If you are a preparer or owner of the eGC1, you can also access the approval flow from the Certify & Route page of the application.
Generally, anyone who appears on the SAGE approval flow is referred to as a reviewer. More specifically, reviewers are either Approvers or Watchers.
Occasionally, there could be a difference in the eGC1 PI and the PI on the sponsor’s application – for example, in the case of career development applications. For more information review the FAQ: When should a PI be designated as an Application PI?
To designate an Application PI, select that role for the person after adding them to the PI, Personnel, & Organizations page. For additional information on research team roles, review the 91̽��Research Personnel���貹����.
If the Application PI is a 91̽��person, SAGE will add the Application PI to the Approval Flow and send an approval required email notification at the appropriate time. If the person selected does not already have an ASTRA role for SAGE, a warning message of “no access: ASTRA permissions required” will display in red once you select the Application PI role. You will need to give them access, so that they can approve the application.
Note: If the Application PI only needs access to SAGE to approve applications, there are two ASTRA roles, Non-PI Eligible Researcher, and Researcher Requiring Faculty Sponsor that could be used.
As part of the approval process, the 91̽��Application PIs are required to certify the PI Assurance Statement which appears in the approval dialog.
The Assurance Statement reads:
I certify that the statements in this eGC1 and the related sponsor application are true, complete and accurate to the best of my knowledge. I am aware that any false, fictitious, or fraudulent statements or claims may subject me to criminal, civil, or administrative penalties. I agree to accept responsibility for the scientific conduct of the project and to provide the required progress reports if a grant is awarded as a result of this application.
The Principal Investigator/Program Director Assurance reads:
I am the PI and I have read and agree with the PI Assurance Statement. I understand that approving this eGC1 electronically is equivalent to my signature.
The following image shows the assurance statement in the approval dialog.
For Grant Runner applications, the person designated as the Application PI will appear as the PD/PI on the SF 424 and Key Person Expanded forms.
Non- 91̽��Application PI Assurance Statement Instructions
If the Application PI is a non- 91̽��person (an affiliate), SAGE will not add them to the approval graph. Since they have a NetID, they could be given access to SAGE and added as an ad hoc approver to the graph. The eGC1 PI is responsible for securing assurance statements for those non- 91̽��Application PIs. The following steps describe the paper process.
Download the (PDF)
Include the 91̽��PI name, eGC1 # and Project Title
This article covers both 91̽��and non- 91̽��Multiple PIs.
91̽��Multiple PI
You may only use the Multiple PI role when specifically allowed or required by the sponsor instructions. For additional information on research team roles, review the 91̽��Research Personnel���貹����.
When including one or more Multiple PIs:
Identify the 91̽��Contact PI as the “Principal Investigator” on the eGC1
List all multiple PIs on the Personnel page of the eGC1 and choose “Multiple PI” from the drop-down list
SAGE will add the Multiple PI to the Approval Flow and send an “approval required” email notification at the appropriate time. If the person selected does not already have an ASTRA role for SAGE, a warning message of “no access: ASTRA permissions required” will display in red once you select the Multiple PI role. You will need to give them access so that they can approve the application.
Note: If the Multiple PI only needs access to SAGE to approve applications, there are two , Non-PI Eligible Researcher, and Researcher Requiring Faculty Sponsor that could be used.
As part of the approval process, the 91̽��Multiple PIs are required to certify the PI Assurance Statement. The image below shows the assurance statement in the approval dialog.
The Assurance Statement reads:
I certify that the statements in this eGC1 and the related sponsor application are true, complete and accurate to the best of my knowledge. I am aware that any false, fictitious, or fraudulent statements or claims may subject me to criminal, civil, or administrative penalties. I agree to accept responsibility for the scientific conduct of the project and to provide the required progress reports if a grant is awarded as a result of this application.
The Principal Investigator/Program Director Assurance statement reads:
I am the PI and I have read and agree with the PI Assurance Statement. I understand that approving this eGC1 electronically is equivalent to my signature.
Non- 91̽��Multiple PI
If the Multiple PI is a non- 91̽��person (an affiliate), SAGE will not add them to the approval graph. If they have a NetID, they could be given access to SAGE and added as an ad hoc approver to the graph.
In most cases a non- 91̽��multiple PI will not have a 91̽��NetID. Therefore, the certification will be handled manually following the Non- 91̽��Multiple PI Assurance Statement Instructions described below.
The eGC1 PI is responsible for securing assurance statements for non- 91̽��Multiple PIs.
Non- 91̽��Multiple PI Assurance Statement Instructions
The following steps describe the paper process.
Download the (PDF)
Include the 91̽��PI name, eGC1 # and Project Title
The Additional Organizational Unit Reviewers section allows you to add reviewers for joint academic appointments, TBA personnel units, space and/or resources, and any other reason.
The Common Interdisciplinary Organizational Unit Reviewers section allows you to quickly select a unit and add their reviewers.
Note: You should keep the PI and Personnel list up-to-date throughout the life of the research project.
Every eCG1 must have a Principal Investigator (PI) listed on the PI, Personnel, & Organizations page. For additional information on who can be a PI, review the 91̽��Research Personnel page.
Note: The person you select to be the PI must have the SAGE ASTRA role of PI. If the person does not, you will see a dialog warning message. The PI must have this role before you can route the application for approval. Each department manages who may be a PI.
In the case of career development applications there could be a difference in the eGC1 PI and the PI on the sponsor’s application. See the article on the Application PI for more details.
To add the PI, select Look Up Principal Investigator and use the Personnel Chooser to search for the PI. You can enter all or part of the person’s name, or search by their 91̽��NetID or Employee ID (EID). Some individuals have more than one appointment. Use the Academic Appointment Type and Unit information to pick the appropriate one for the project.
Once you add a PI, the Change the Principal Investigator? link displays.
Data for the PI comes from the and Workday academic appointment or position information.
Name and Employee ID Number
Selected Unit: The unit associated with the academic appointment or position selected when choosing the PI
Title: Based on the academic appointment or position selected
Primary Position Unit: The unit associated with the PI’s primary position
91̽��box number: The 91̽��box number for the PI’s primary position
Phone, Fax: The PI’s office phone and fax numbers, if available from the directory
Cell Phone, Pager: This information is optional
Email: The PI’s full campus email address from the directory
Note: If the selected PI has opted out from the 91̽��Directory, SAGE will not pull in email address data. In this case, the email address field will be blank and the preparer will need to manually enter the PI’s email address.
If your project has one or more multiple PIs, see the Multiple PIs article on how to designate them.
Use this section to provide information about the use of vertebrate animals in the project to allow reviewers to determine compliance with 91̽��and sponsor requirements. If you have questions regarding the use of Vertebrate Animals, please contact the
Note: Hoverboard data will be refreshed each time you view this page.
As with other eGC1 pages, you can partially complete your entries and save the eGC1. You must complete the required fields before you route your eGC1 for approval.
Select Start Section to open the section initially, and then Edit Section to add or update existing data.
Animal Use Question
AU-1:
Will the project involve the use of vertebrate animals?
Answer: Yes or No
A table for Animal Use Protocols and an Add Protocol button display if AU-1 = Yes
Note: If AU-1 = Yes, then you must include at least one protocol.
Add Protocol
You can add a protocol in three ways. Start by selecting Add Protocol. By default, the 91̽��Protocol choice displays. Select the appropriate protocol type link from there.
Use this to search Hoverboard and import your data. Start by entering at least 3 digits of your protocol number. The search will return any items that contain the digits you enter. Click in the results list to select the appropriate item. The following image shows a results list after searching for “123”.
When you select a protocol from the results list, the following data displays in the dialog window:
Protocol Number
Protocol Title
Protocol PI
Primate Center Involved – Yes or No
Expiration Date
Select Next to continue the process. The dialog will display the question “Does the protocol require an amendment?” Answer Yes or No.
Select Save to return to the Animal Use section.
Note: If the value for Primate Center Involved is Yes, the Primate Center will be added to the approval flow as an Approver.
The following image show the amendment question in the dialog window, with Yes selected.
External Protocol
Select this choice in the Add Protocol dialog to enter an External Protocol. Select the appropriate institution from the drop-down menu.
The choices are:
Allen Institute
Center for Infectious Disease Research (CIDR)
Fred Hutchinson Cancer Research Center (FHCRC)
Seattle Children’s Research Institute (SCRI)
VA Puget Sound Health Care System (VAPSHCS)
Benaroya Research Institute of Virginia Mason (BRI)
Add a New Institute
The following image shows the initial screen with the drop-down menu expanded.
When you select one of the existing institutions from the menu, its details will display. These fields are
Assurance Number
Institution Country
Institution City
You can find more information about assurance numbers on these NIH web pages:
Domestic Assurances:
Foreign Assurances:
The following image shows the details for Fred Hutchinson Cancer Center (FHCC).
Select Next to enter your Protocol Number and the Expiration Date.
The following image shows this step, with some example data entered.
Select Save to complete your entry. You can save a partial entry. It must be complete prior to routing your application.
The following image shows the expanded table row from this entry on the compliance summary page.
Add a New Institution
If you select “Add a New Institution” from the External Protocol list, the dialog will display the following fields:
Institution
Assurance Number (optional)
Institution Country
Add the appropriate information for these fields. Note that if you select any country other than the United States of America, you must also enter an Institution City.
The following image shows the first page of the dialog.
���������Next to display the section page of the dialog. Enter the Protocol Number and its Expiration Date.
Select Save to complete your entry. You can save a partial entry. It must be complete prior to routing your application. The added information will display similarly to the existing external institution entries.
New Protocol
If you will be establishing a new protocol, select that option from the initial Add Protocol dialog box. You just need to answer yes or no to the question “Will the Primate Center be involved in the research?”
If you select Yes, the Primate Center will be added to the approval flow as an Approver.
The following image shows the New Protocol dialog with the Primate Center question.
Use this section to provide information about human subject involvement and approvals for the project to help reviewers determine compliance with 91̽��and sponsor requirements. Contact the Human Subjects Division with questions.
Note: Zipline data will be refreshed each time you view this page.
As with other eGC1 pages, you can partially complete your entries and save the eGC1. You must complete the required fields before you route your eGC1 for approval.
Select Start Section to open the section initially, and then Edit Section to add or update existing data.
Human Subjects Questions:
HS-1:
Will the project involve interaction with Human Subjects, or identifiable data or specimens from human subjects?
Answer: Yes or No. An answer is required.
HS-1A.
Note: HS-1A displays if HS-1 = Yes
Delayed Onset: Will IRB application submission be delayed until after award because you will (1) identify and develop new protocols that will be supported by the award or (2) complete other research described in the proposal that is necessary before the human subjects research can be fully planned.
Answer: Yes or No
HS-1B:
Note:HS-1B displays if HS-1 = Yes
IRB Approval Pending: Will you need to submit a new IRB application, modify an existing IRB application, or are awaiting approval of a current IRB application for the human subject research in this project?
Answer: Yes or No
A table for IRB Application Details displays if HS-1 = Yes
Note: If HS-1 = Yes, and HS-1A = No (Delayed Onset), and HS-1B = No (IRB Approval Pending), then you must include at least one IRB application. See details below on how to add an IRB Application.
HS-1C:
Note:HS-1C displays if HS-1 = Yes AND Sponsored Program Activity Type (Details page) is “Clinical Trial – Federal Sponsors” or “Clinical Trial – Non-Federal Sponsors”
CRBB Involvement. Will the project involve use of 91̽��Medicine clinical services or clinical space as a site of patient care, or include medical treatment of a patient by a 91̽��Physicians provider?
Answer: Yes or No
91̽��CTO ( 91̽��Medicine Clinical Trials Office) Note: If any of the following statements apply to this proposed work, mark Yes, even if the research involves only usual patient care items or the study budget will not be charged.
Some of the proposed work will be conducted in a 91̽��Medicine clinical setting. See for a complete list of sites. Studies using Seattle Cancer Care Alliance locations should use the SRAMP access point when submitting to CTO.
The study involves one or more clinical procedures at one of these sites, such as use of a patient examination room, blood draws, imaging, clinical lab tests, administration of a research medication, or procedures.
Payment of physician professional fees for clinical services from a UW-affiliated or Northwest Hospital physician is required, separate from the salaried research personnel effort reflected in the budget.
Contact CTO at uwcto@uw.edu or 206-543-7774 for assistance.
HS-2
Stem Cells. Will this research involve the use and/or creation of human embryonic stem cells?
Answer: Yes or No. An answer is required.
Add IRB Application
Start by selecting Add IRB Application. A dialog box will open where you can choose how you enter your data.
You can use the blue “X” in the upper, right-hand corner to close the dialog and return to the Human Subjects section without saving any data.
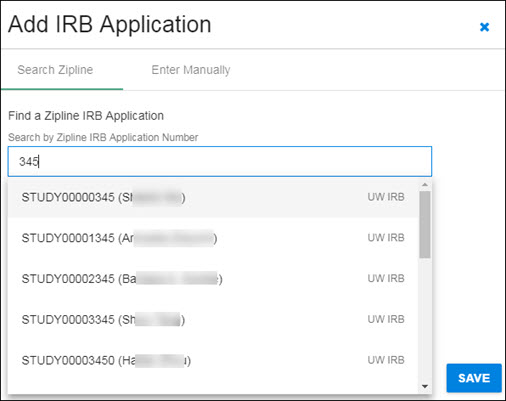
The following image shows the initial dialog box.
Enter all or part of the Zipline Application Number in the search box. The system will search for all applications that contain the entered numbers in the application number field. The results list will display below the search box, as shown in the following image.
Click on the appropriate study in the results list to select it. The study data will display in the dialog window, as shown in the following image.
Use the Save button in the lower, right-hand corner to add the study data, and return to the Human Subjects section.
Enter Manually
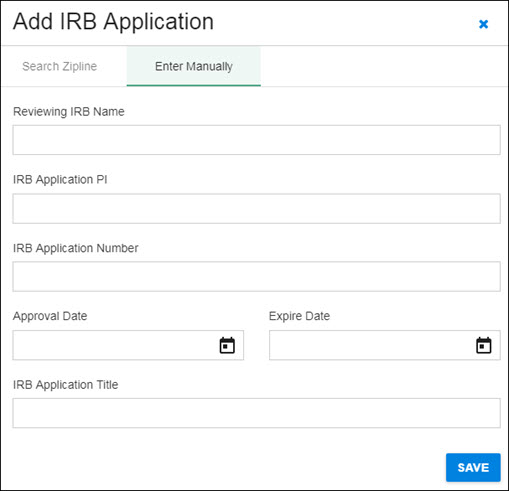
You have the option to add IRB Application information manually. Select Enter Manually in the dialog, then add the requested information.
Reviewing IRB Name
IRB Application PI
Reviewing IRB Application Number
Approval Date
Expire Date
IRB Application Title
Select Save to return to the Human Subjects section.
Note: All of the fields are required prior to eGC1 completion.
The following image shows the manual entry screen.
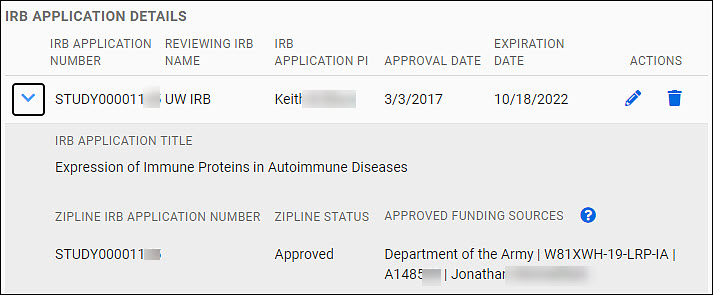
IRB Application Details section
Your data will appear as an expandable row of a table in the IRB Application Details section of the page.
The table row shows the follow data fields:
IRB Application Number
Reviewing IRB Name
IRB Application PI
Approval Date
Expiration Date
You can edit or delete it using the pencil or trash icons in the Actions column at the far right of the table row.
Use the chevron to the left of the row to expand the data shown. The additional data displayed includes:
IRB Application Title
Zipline Application Number
Zipline Status
Approved Funding Sources
The following image shows an expanded table entry.